
Contents
I. Introduction

Welcome to the world of dog CPR and emergency techniques! As a responsible dog owner, it is crucial to be prepared for any unforeseen emergencies that may arise. Knowing how to administer CPR and other life-saving techniques can make all the difference in saving your furry friend’s life.
In this article, we will explore the essential skills every dog owner should know to handle emergency situations confidently. From performing CPR to managing choking incidents, we will cover a range of techniques that can help stabilize your dog’s condition until professional help arrives.
Our aim is to provide you with a comprehensive guide that not only educates but also empowers you to take immediate action when your dog’s life is at stake. We understand that emergencies can be overwhelming, but with the right knowledge and skills, you can become your dog’s first responder.
Throughout this article, we will delve into the step-by-step processes of administering CPR, managing choking incidents, and handling other common emergencies. We will also discuss the importance of recognizing the signs of distress and how to assess your dog’s vital signs.
Remember, time is of the essence in emergency situations. By equipping yourself with the necessary skills and knowledge, you can be the hero your dog needs in a crisis. So, let’s dive in and learn the life-saving skills that every dog owner should know!
II. Understanding Dog CPR
In this section, we will delve into the definition and purpose of dog CPR, as well as explore the basic anatomy and physiology of a dog’s respiratory and circulatory systems. We will also discuss the signs of respiratory distress and cardiac arrest in dogs.
A. Definition and Purpose of Dog CPR
Dog CPR, or cardiopulmonary resuscitation, is an emergency procedure performed on dogs to restore their breathing and circulation in cases of respiratory distress or cardiac arrest. It involves a combination of chest compressions and artificial respiration to keep the dog’s vital organs oxygenated.
The purpose of dog CPR is to buy time until professional veterinary help can be sought. It can be a life-saving technique that can make a critical difference in the outcome of a dog’s health.
B. Basic Anatomy and Physiology of a Dog’s Respiratory and Circulatory Systems
To understand dog CPR, it is essential to have a basic understanding of a dog’s respiratory and circulatory systems.
A dog’s respiratory system consists of the nose, throat, windpipe, and lungs. When a dog breathes in, air enters through the nose and travels down the windpipe into the lungs. The lungs then oxygenate the blood, which is circulated throughout the body.
The circulatory system of a dog comprises the heart, blood vessels, and blood. The heart pumps oxygenated blood from the lungs to the rest of the body, delivering vital nutrients and oxygen to the organs and tissues. It also carries waste products, such as carbon dioxide, back to the lungs to be exhaled.
C. Signs of Respiratory Distress and Cardiac Arrest in Dogs
Recognizing the signs of respiratory distress and cardiac arrest in dogs is crucial for prompt intervention and effective dog CPR.
Signs of respiratory distress may include:
- Rapid or labored breathing
- Wheezing or gasping for air
- Excessive coughing
- Blue or pale gums
- Collapsing or inability to stand
On the other hand, signs of cardiac arrest in dogs may include:
- No pulse or heartbeat
- Loss of consciousness
- Unresponsiveness
- Gasping or agonal breathing
It is important to note that these signs may vary depending on the underlying cause of the distress or arrest. Immediate action should be taken if any of these signs are observed.
III. Preparing for Pet Emergencies

As a pet owner, it is essential to be prepared for any emergencies that may arise. Just like humans, pets can experience accidents or sudden illnesses that require immediate attention. In this section, we will discuss the steps you can take to prepare for pet emergencies, including creating a pet first aid kit, identifying potential hazards in the home and outdoors, and knowing the location of the nearest emergency veterinary clinic.
A. Creating a pet first aid kit
Having a well-stocked pet first aid kit can make a significant difference in providing immediate care to your furry friend during an emergency. Here are some essential items to include in your kit:
- Gauze pads and bandages to control bleeding
- Antiseptic wipes or solution to clean wounds
- Tweezers or tick remover tool to remove ticks or splinters
- Scissors to cut bandages or remove tangled fur
- Disposable gloves to protect yourself from bodily fluids
- Thermometer to monitor your pet’s temperature
- Hydrogen peroxide to induce vomiting (only under the guidance of a veterinarian)
- Saline solution for flushing eyes or wounds
- Emergency contact numbers for your veterinarian and poison control
- Any necessary medications or prescriptions for your pet
Remember to regularly check and replenish the supplies in your pet first aid kit to ensure its effectiveness when needed.
B. Identifying potential hazards in the home and outdoors
Prevention is key when it comes to pet emergencies. By identifying potential hazards in your home and the surrounding environment, you can minimize the risk of accidents or injuries. Here are some common hazards to watch out for:
- Household chemicals and cleaning products: Keep these items securely stored in cabinets or out of your pet’s reach.
- Electrical cords: Secure cords and keep them out of your pet’s chewing range to prevent electrocution.
- Toxic plants: Some plants, such as lilies, azaleas, and sago palms, can be toxic to pets if ingested. Remove these plants from your home or keep them in areas inaccessible to your pet.
- Open windows or balconies: Make sure windows are securely screened, and balconies have sturdy railings to prevent falls.
- Sharp objects or small toys: Keep these items out of your pet’s reach to prevent choking or injuries.
- Unsecured garbage bins: Dispose of trash properly and use pet-proof containers to prevent your pet from ingesting harmful substances.
- Outdoor hazards: Be aware of potential dangers in your yard, such as toxic plants, sharp objects, or open bodies of water.
Regularly inspect your home and outdoor areas for any potential hazards and take the necessary steps to eliminate or minimize them.
C. Knowing the location of the nearest emergency veterinary clinic
In case of a pet emergency, it is crucial to know the location of the nearest emergency veterinary clinic. Research and find a reputable emergency clinic in your area and keep their contact information readily available. It is also a good idea to familiarize yourself with the clinic’s operating hours and any specific procedures for after-hours emergencies.
Additionally, consider saving the contact information of a pet ambulance service if available in your area. These services can provide transportation to the veterinary clinic in case your pet requires immediate medical attention.
By being prepared and taking proactive measures, you can ensure that you are ready to handle any pet emergencies that may arise. Remember, quick action and access to proper medical care can make a significant difference in the outcome for your beloved pet.
IV. Initial Assessment and Safety Measures

When faced with an emergency situation involving a dog, it is crucial to prioritize safety and assess the scene for potential dangers. This will ensure that both you and the injured or unconscious dog are protected throughout the rescue process.
A. Assessing the scene for potential dangers
Before approaching the dog, take a moment to evaluate the surroundings and identify any potential hazards. This step is essential to prevent further injuries or accidents. Here are some key points to consider:
- Check for traffic: If the incident occurred near a road or in a busy area, be cautious of passing vehicles. Ensure that you are visible to drivers and take necessary precautions to avoid any accidents.
- Look out for aggressive dogs: In some cases, an injured dog may become defensive or aggressive due to fear or pain. Scan the area for other dogs that may pose a threat and keep a safe distance.
- Assess the terrain: Take note of any uneven surfaces, sharp objects, or slippery areas that could pose a risk to you or the dog. Be mindful of your footing and choose the safest approach route.
- Identify potential hazards: Look for any toxic substances, electrical wires, or other dangerous objects in the vicinity. Remove or secure these items before attempting to provide aid to the dog.
By thoroughly assessing the scene for potential dangers, you can minimize the risk of further harm and ensure a safe environment for both you and the injured dog.
B. Approaching an injured or unconscious dog safely
Approaching an injured or unconscious dog requires caution and gentle handling to avoid causing additional distress or harm. Follow these steps to safely approach the dog:
- Maintain a calm demeanor: Dogs can sense fear or anxiety, which may escalate their stress levels. Stay calm and composed to create a reassuring environment for the dog.
- Approach from the side: Avoid approaching the dog head-on, as this may be perceived as a threat. Instead, approach from the side in a slow and non-threatening manner.
- Use a soothing voice: Speak in a soft and soothing tone to help calm the dog. Avoid sudden movements or loud noises that could startle or agitate them further.
- Assess the dog’s body language: Observe the dog’s posture and behavior for any signs of aggression or discomfort. If the dog appears distressed or defensive, give them space and reassess the situation.
- Offer a gentle touch: Once you have established a non-threatening presence, slowly extend your hand for the dog to sniff. If the dog seems receptive, you can proceed to provide necessary first aid.
Remember, every dog is unique, and their response may vary. It is crucial to approach each situation with sensitivity and adapt your approach based on the dog’s behavior and comfort level.
C. Checking for responsiveness and breathing
Assessing a dog’s responsiveness and breathing is a critical step in determining the severity of their condition and the appropriate course of action. Follow these steps to check for responsiveness and breathing:
- Call the dog’s name: Speak the dog’s name in a clear and calm voice to see if they respond. Look for any signs of movement, such as lifting their head or opening their eyes.
- Check for breathing: Place your hand on the dog’s chest to feel for any movement indicating breathing. Observe the rise and fall of their chest or listen for any sounds of breathing.
- Look for other signs of life: Assess the dog’s overall responsiveness by checking for a pulse or any other signs of circulation, such as a heartbeat or movement of blood vessels.
If the dog is unresponsive and not breathing, immediate action is required to perform CPR and provide life-saving measures. However, if the dog is responsive and breathing, it is still crucial to seek veterinary assistance to ensure their well-being.
Remember, these initial assessments and safety measures are essential for your safety and the well-being of the injured or unconscious dog. By following these guidelines, you can provide the necessary aid while minimizing risks and ensuring the best possible outcome.
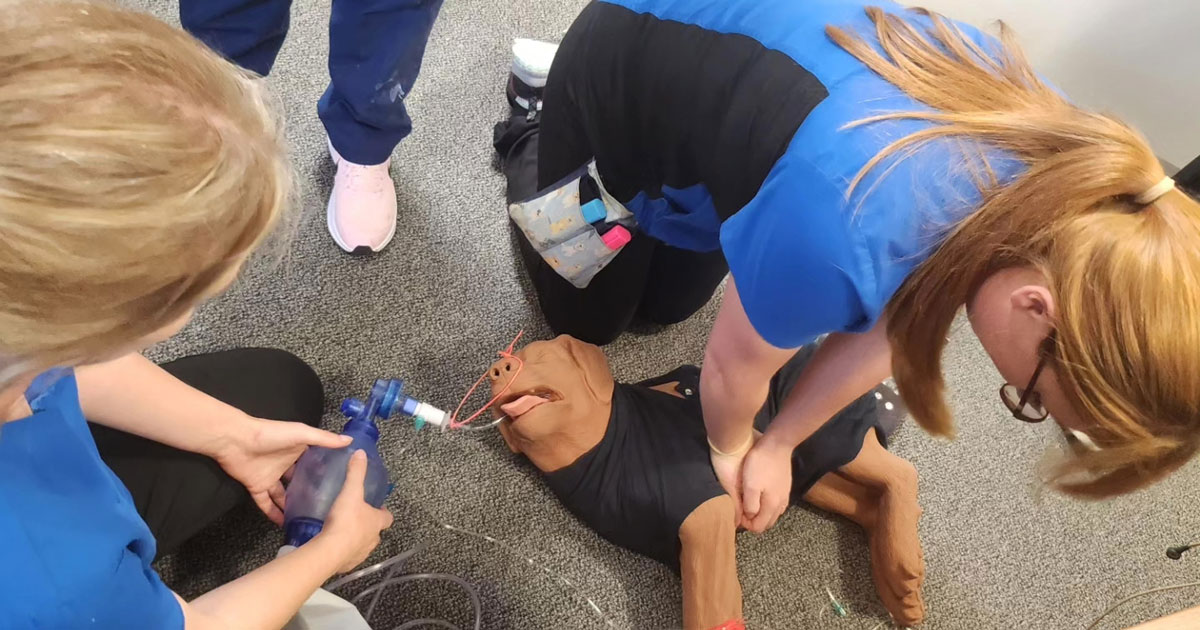
V. Performing Dog CPR

Performing CPR on a dog can be a life-saving skill in emergency situations. As a responsible dog owner, it is essential to be prepared and equipped with the knowledge of how to perform CPR on your furry friend. In this section, we will provide a step-by-step guide to performing CPR on a dog, demonstrate proper hand placement and technique, and offer tips for performing CPR on different dog sizes and breeds.
A. Step-by-step guide to performing CPR on a dog
When performing CPR on a dog, it is crucial to follow a systematic approach to maximize the chances of reviving them. Here is a step-by-step guide:
- Chest compressions: Begin by laying your dog on a flat surface, preferably on their right side. Locate the heart, which is located behind the left elbow. Place one hand on top of the other and interlock your fingers. Apply firm pressure to compress the chest, aiming for a depth of about one-third to one-half of the chest width. Perform 100-120 compressions per minute.
- Rescue breaths: After every 30 compressions, it’s time to provide rescue breaths. Extend your dog’s neck and close their mouth. Cover their nose with your mouth and blow gently until you see the chest rise. Give two breaths, ensuring that the chest rises each time.
- The ratio of compressions to breaths: The recommended ratio for CPR in dogs is 30 compressions to 2 breaths. Continue this cycle until your dog shows signs of recovery or until you can seek professional veterinary help.
B. Demonstrating proper hand placement and technique
Proper hand placement and technique are crucial for effective CPR on a dog. Here’s how to ensure you are doing it correctly:
1. Lay your dog on a flat surface, preferably on their right side.
2. Place one hand on top of the other, interlocking your fingers.
3. Position your hands just behind the dog’s elbow, directly over the heart.
4. Apply firm and steady pressure to compress the chest.
5. Allow the chest to fully recoil between compressions to facilitate blood circulation.
C. Tips for performing CPR on different dog sizes and breeds
Performing CPR may vary slightly depending on the size and breed of the dog. Here are some tips to keep in mind:
1. Small dogs: For small dogs, use your thumb and forefinger to compress the chest gently. Be cautious not to apply excessive force that could cause injury.
2. Large dogs: For larger dogs, you may need to use both hands to compress the chest adequately. Adjust the pressure according to the size and weight of the dog.
3. Brachycephalic breeds: Brachycephalic breeds, such as Bulldogs and Pugs, have unique respiratory anatomy. Be mindful of their short snouts and take extra care when performing rescue breaths to avoid obstruction.
4. Tailor the technique: If you have knowledge of your dog’s specific health conditions or breed-related characteristics, consult with your veterinarian to tailor the CPR technique accordingly.
Remember, performing CPR on a dog is not a substitute for professional veterinary care. It is crucial to seek immediate veterinary assistance even if your dog shows signs of recovery. CPR is meant to provide temporary assistance until professional help is available.
VI. Choking and Airway Obstruction
Choking and airway obstruction can be life-threatening situations for dogs. As a responsible dog owner, it is crucial to recognize the signs of choking and know how to perform the necessary emergency techniques to clear the airway obstruction. In this section, we will discuss how to recognize the signs of choking in dogs, how to perform the Heimlich maneuver on a choking dog, and how to clear airway obstructions using back blows and chest thrusts.
A. Recognizing the signs of choking in dogs
When a dog is choking, it may exhibit various signs that indicate an airway obstruction. It is essential to be able to recognize these signs promptly to provide immediate assistance. Some common signs of choking in dogs include:
- Difficulty breathing or gasping for air
- Excessive pawing at the mouth
- Choking sounds or coughing
- Blue or pale gums
- Weakness or collapse
If you notice any of these signs in your dog, it is crucial to act quickly to prevent further complications.
B. Performing the Heimlich maneuver on a choking dog
The Heimlich maneuver, also known as abdominal thrusts, is a technique used to dislodge an object blocking the airway. When performing the Heimlich maneuver on a choking dog, follow these steps:
- Stand behind the dog and place your hands just below the ribcage.
- Make a fist with one hand and place it above the dog’s abdomen but below the ribcage.
- Grasp your fist with your other hand and give firm, upward thrusts.
- Repeat the thrusts until the object is dislodged or the dog can breathe on its own.
It is important to apply enough pressure to dislodge the object but be careful not to exert excessive force that could harm the dog.
C. Clearing airway obstructions using back blows and chest thrusts
In some cases, the Heimlich maneuver may not be effective in clearing the airway obstruction. In such situations, you can try using back blows and chest thrusts to dislodge the object. Follow these steps:
- Place the dog on its side.
- Stand or kneel behind the dog.
- With one hand, support the dog’s back and head.
- Use the heel of your other hand to deliver firm back blows between the shoulder blades.
- If back blows do not work, try chest thrusts by placing your hands on either side of the dog’s chest and applying firm pressure.
- Continue alternating between back blows and chest thrusts until the object is dislodged.
It is important to remain calm and focused while performing these emergency techniques. If the dog remains unresponsive or the obstruction persists, seek immediate veterinary assistance.
Remember, prevention is always better than cure. Take precautions to minimize the risk of choking in your dog by providing appropriate-sized food and toys, supervising playtime, and keeping hazardous objects out of reach. Being prepared and knowledgeable about dog CPR and emergency techniques can make a significant difference in saving your furry friend’s life.
VII. Bleeding and Wound Care
In this section, we will discuss how to assess the severity of a bleeding wound, apply direct pressure, use a tourniquet if necessary, and clean and dress wounds to prevent infection. As an experienced dog owner and someone who has dealt with emergencies involving my own pets, I understand the importance of knowing how to provide immediate care in such situations.
A. Assessing the Severity of a Bleeding Wound
When faced with a bleeding wound, it is crucial to quickly assess the severity of the injury. This will help you determine the appropriate course of action and whether professional veterinary care is required. Start by examining the wound and identifying the source of bleeding. If the bleeding is minor and can be controlled with basic first aid measures, you can proceed with treating the wound at home.
However, if the bleeding is severe and continuous, it may indicate a major blood vessel injury or internal bleeding. In such cases, it is essential to seek immediate veterinary assistance. Keep in mind that even seemingly minor wounds can lead to significant bleeding in certain situations, such as when a blood vessel is punctured.
To assess the severity of a bleeding wound, follow these steps:
- Apply gentle pressure around the wound using a clean cloth or gauze pad. This will help you determine the rate and amount of bleeding.
- Observe the color of the blood. Bright red blood indicates arterial bleeding, while dark red or maroon blood suggests venous bleeding.
- Check for signs of shock, such as pale gums, rapid breathing, and a weak pulse. Severe bleeding can lead to shock, which requires immediate medical attention.
- Assess the wound for depth, size, and location. Deep wounds or those near vital organs may require professional intervention.
Remember, if you are unsure about the severity of the bleeding or if your dog’s condition worsens, it is always best to err on the side of caution and seek professional help.
B. Applying Direct Pressure and Using a Tourniquet if Necessary
Once you have assessed the severity of the bleeding wound and determined that it can be treated at home, the next step is to apply direct pressure to control the bleeding. Direct pressure helps promote blood clotting and reduces the flow of blood from the wound.
To apply direct pressure:
- Place a clean cloth or gauze pad directly over the wound.
- Apply firm and steady pressure with your hand or fingers.
- Hold the pressure for at least 5 minutes without lifting to allow the blood to clot.
- If the bleeding persists, you may need to apply additional pressure or consider using a tourniquet.
A tourniquet is a last resort measure used to control severe bleeding when direct pressure alone is insufficient. It should only be used in extreme cases where the bleeding cannot be controlled by other means. Applying a tourniquet incorrectly or leaving it on for too long can cause tissue damage and potentially lead to limb loss.
If you find it necessary to use a tourniquet, follow these guidelines:
- Use a wide, non-elastic band, such as a belt or a strip of fabric.
- Place the tourniquet above the wound, closer to the body, and avoid placing it directly over a joint.
- Tighten the tourniquet until the bleeding stops.
- Secure the tourniquet in place using a knot or a clip.
- Seek immediate veterinary assistance after applying a tourniquet, as it should only be considered a temporary measure.
Remember, tourniquets should only be used in life-threatening situations and should not be kept on for longer than 1 to 2 hours.
C. Cleaning and Dressing Wounds to Prevent Infection
After controlling the bleeding, it is crucial to clean and dress the wound properly to prevent infection. Dogs are prone to developing infections, especially in open wounds, which can delay the healing process and lead to further complications.
Follow these steps to clean and dress a bleeding wound:
- Wash your hands thoroughly with soap and water or use gloves to prevent contamination.
- Gently flush the wound with a mild antiseptic solution or clean water to remove dirt, debris, and bacteria.
- Use a clean cloth or gauze pad to pat the wound dry. Avoid rubbing, as it can further damage the tissue.
- Apply an appropriate wound dressing, such as a sterile non-stick pad or a clean cloth, to protect the wound and promote healing.
- Secure the dressing in place using a bandage or adhesive tape, ensuring it is snug but not too tight to restrict blood flow.
It is important to monitor the wound for any signs of infection, such as redness, swelling, discharge, or a foul odor. If you notice any concerning symptoms or if the wound does not show signs of improvement within a few days, consult a veterinarian for further evaluation and treatment.
By assessing the severity of a bleeding wound, applying direct pressure, using a tourniquet if necessary, and properly cleaning and dressing the wound, you can provide immediate care to your dog in emergency situations. Remember, always prioritize your pet’s safety and well-being, and seek professional help when needed.
VIII. Fractures and Limb Injuries
When it comes to our furry friends, accidents can happen at any time. Dogs are active creatures, and sometimes they may experience fractures or injuries to their limbs. As a responsible dog owner, it’s essential to be able to identify the signs of fractures and limb injuries and provide appropriate first aid. In this section, we will discuss how to identify these injuries and provide initial care to your beloved pet.
A. Identifying signs of fractures and limb injuries in dogs
Fractures and limb injuries in dogs can occur due to various reasons, such as accidents, falls, or even excessive physical activity. It’s crucial to be able to recognize the signs of these injuries to ensure timely and appropriate treatment. Here are some common signs to look out for:
- Limping or favoring a limb
- Swelling or bruising around the injured area
- Pain or sensitivity when the injured limb is touched
- Visible deformity or abnormal positioning of the limb
- Reluctance to put weight on the injured limb
- Whimpering or yelping in pain
If you notice any of these signs, it’s essential to handle your dog with care and seek veterinary attention as soon as possible. Remember, dogs may try to hide their pain, so it’s crucial to be observant and attentive to any changes in their behavior or mobility.
B. Providing first aid for fractures, sprains, and strains
When your dog experiences a fracture, sprain, or strain, providing immediate first aid can help alleviate pain and prevent further damage. Here are some steps to follow:
- Keep your dog calm: It’s essential to keep your dog as calm and still as possible to avoid exacerbating the injury.
- Assess the injury: Carefully examine the affected limb to determine the extent of the injury. If you suspect a fracture, be cautious when handling the limb to prevent additional damage.
- Control bleeding (if present): If there is any bleeding, apply gentle pressure with a clean cloth or bandage to control it. Do not apply a tourniquet unless instructed by a veterinarian.
- Immobilize the limb: Depending on the severity of the injury, you may need to immobilize the limb using a splint or bandage. This will help prevent further movement and reduce pain.
- Elevate the limb (if possible): If there is no risk of exacerbating the injury, elevating the limb slightly can help reduce swelling.
- Transport your dog to a veterinarian: It’s crucial to seek professional veterinary care as soon as possible. The veterinarian will be able to assess the injury accurately and provide appropriate treatment.
Remember, providing first aid is not a substitute for professional veterinary care. It’s essential to consult a veterinarian for a thorough evaluation and treatment plan.
C. Immobilizing the injured limb using splints or bandages
When it comes to immobilizing an injured limb, splints and bandages can be effective tools. However, it’s crucial to use them correctly to avoid causing further harm. Here are some guidelines for immobilizing an injured limb:
- Choose the right materials: Use soft padding, such as cotton or gauze, to provide cushioning and protect the skin. Avoid using materials that can cause irritation or restrict blood flow.
- Stabilize the joint: If the injury involves a joint, it’s essential to immobilize the joint above and below the injury site. This will help prevent movement and promote healing.
- Apply the splint or bandage: Carefully apply the splint or bandage, making sure it is snug but not too tight. Avoid covering the toes or footpad to ensure proper circulation.
- Monitor regularly: Check the splint or bandage regularly for any signs of discomfort, swelling, or restricted blood flow. If you notice any issues, consult a veterinarian for adjustments.
Remember, immobilizing the limb is a temporary measure to provide stability and reduce pain. It’s crucial to seek veterinary care for a thorough evaluation and appropriate treatment.
By being able to identify signs of fractures and limb injuries in dogs and providing initial first aid, you can help ensure the well-being and comfort of your furry companion. Remember, always consult a veterinarian for professional advice and treatment.
IX. Heatstroke and Hypothermia
In this section, we will discuss the symptoms of heatstroke and hypothermia in dogs, as well as how to safely cool down an overheated dog and warm up a hypothermic dog. As a dog owner, it is important to be aware of these conditions and know how to respond in case of an emergency.
A. Recognizing the symptoms of heatstroke and hypothermia in dogs
Heatstroke occurs when a dog’s body temperature rises to dangerously high levels. This can happen when a dog is exposed to high temperatures for an extended period of time, such as being left in a hot car or exercising vigorously in hot weather. Some common symptoms of heatstroke in dogs include:
- Excessive panting and drooling
- Red or pale gums
- Weakness or collapse
- Vomiting or diarrhea
- Rapid heartbeat
- Seizures
If you notice any of these symptoms in your dog, it is important to act quickly. Move your dog to a cool, shaded area and offer them water to drink. You can also wet their fur with cool water or use a damp towel to help lower their body temperature. However, it is crucial to avoid using ice-cold water or ice packs, as this can cause the blood vessels to constrict and prevent the body from cooling down effectively.
Hypothermia, on the other hand, occurs when a dog’s body temperature drops below normal levels. This can happen when a dog is exposed to cold temperatures for a prolonged period of time or gets wet and is unable to dry off. Some common symptoms of hypothermia in dogs include:
- Shivering
- Weakness or lethargy
- Slow or shallow breathing
- Pale or blue gums
- Loss of coordination
- Unresponsiveness
If you suspect that your dog is experiencing hypothermia, it is important to act quickly to warm them up. Move your dog to a warm and dry area, and wrap them in a blanket or towel to help retain their body heat. You can also use warm water bottles or heating pads, but be sure to wrap them in a towel or cloth to prevent direct contact with your dog’s skin.
B. Cooling down an overheated dog safely
If your dog is suffering from heatstroke, it is crucial to cool them down safely and effectively. Follow these steps to help lower their body temperature:
- Move your dog to a cool and shaded area away from direct sunlight.
- Offer your dog small amounts of cool water to drink. Do not force them to drink, as this can cause them to choke.
- Wet your dog’s fur with cool water or use a damp towel to help lower their body temperature. Focus on areas with less fur, such as the belly and armpits.
- Use a fan or air conditioning to circulate cool air around your dog.
- Monitor your dog’s body temperature using a rectal thermometer. Once their temperature reaches 103°F (39.4°C), stop the cooling measures to prevent them from becoming too cold.
- Seek veterinary attention immediately, even if your dog’s condition appears to improve. Heatstroke can cause internal damage that may not be immediately apparent.
C. Warming up a hypothermic dog gradually
If your dog is experiencing hypothermia, it is important to warm them up gradually to avoid shock. Follow these steps to help raise their body temperature:
- Move your dog to a warm and dry area away from cold drafts.
- Wrap your dog in a blanket or towel to help retain their body heat.
- Use warm water bottles or heating pads wrapped in a towel or cloth to provide additional warmth. Place them near your dog’s body, focusing on the chest and abdomen.
- Monitor your dog’s body temperature using a rectal thermometer. Once their temperature reaches 100°F (37.8°C), remove the warming measures to prevent them from becoming too hot.
- Seek veterinary attention as soon as possible, as hypothermia can lead to serious complications if left untreated.
Remember, heatstroke and hypothermia can be life-threatening for dogs. It is important to take immediate action if you suspect that your dog is experiencing either of these conditions. By recognizing the symptoms and knowing how to respond, you can potentially save your dog’s life.
In this section, we will discuss common household substances that are toxic to dogs, steps to take in case of poisoning, and the importance of contacting a veterinarian or poison control center.
A. Common household substances toxic to dogs
Dogs are curious creatures, and they often explore their surroundings by sniffing, licking, and even chewing on objects. Unfortunately, some common household substances can be toxic to dogs if ingested. It is important for dog owners to be aware of these substances and take necessary precautions to keep them out of their pet’s reach.
1. Chocolate: Chocolate contains theobromine, which is toxic to dogs. Dark chocolate and baking chocolate are particularly dangerous due to their high theobromine content. Ingestion of chocolate can cause symptoms such as vomiting, diarrhea, increased heart rate, and even seizures.
2. Grapes and raisins: Grapes and raisins can cause kidney failure in dogs. Even a small amount can be toxic and lead to symptoms like vomiting, diarrhea, and lethargy. It is best to keep grapes and raisins away from your furry friend.
3. Xylitol: Xylitol is a sugar substitute commonly found in sugar-free gum, candies, and baked goods. It can cause a rapid release of insulin in dogs, leading to low blood sugar levels. Symptoms of xylitol poisoning include vomiting, loss of coordination, and seizures.
4. Household cleaners: Many household cleaners contain chemicals that can be harmful to dogs if ingested or inhaled. Bleach, ammonia, and certain disinfectants can cause respiratory distress, gastrointestinal upset, and even chemical burns.
5. Medications: Human medications, such as painkillers, antidepressants, and even over-the-counter drugs like ibuprofen, can be toxic to dogs. Ingestion of these medications can result in symptoms like vomiting, diarrhea, lethargy, and in severe cases, organ damage.
It is important to note that this is not an exhaustive list, and there are many other substances that can be toxic to dogs. If you suspect your dog has ingested something toxic, it is always best to contact a veterinarian or a poison control center immediately.
B. Steps to take in case of poisoning
Discovering that your dog has been poisoned can be a terrifying experience for any pet owner. However, it is crucial to stay calm and take immediate action to help your furry friend. Here are some steps to take in case of poisoning:
1. Remove the source: If you know what your dog has ingested and it is still within reach, try to remove it from their mouth. However, be cautious as some substances may be harmful to you as well. Use gloves or a cloth to protect yourself.
2. Assess the situation: Look for any visible signs of distress or discomfort in your dog. Check for symptoms such as vomiting, diarrhea, difficulty breathing, seizures, or collapse. Take note of any information that may be helpful for the veterinarian or poison control center.
3. Contact a veterinarian or poison control center: It is essential to seek professional help immediately. Call your veterinarian or a poison control center to get guidance on what steps to take next. They will be able to provide you with specific instructions based on the substance ingested and your dog’s condition.
4. Follow their advice: Once you have contacted a professional, follow their instructions carefully. They may ask you to induce vomiting or administer activated charcoal, depending on the situation. It is crucial to follow their guidance to ensure the best possible outcome for your dog.
Remember, time is of the essence in cases of poisoning. The sooner you seek help, the better the chances of a positive outcome for your furry friend.
C. Contacting a veterinarian or poison control center
When it comes to poisoning, it is crucial to seek professional help as soon as possible. Contacting a veterinarian or a poison control center can provide you with the guidance and support you need in such situations. Here’s why it is important:
1. Expert advice: Veterinarians and poison control centers have the knowledge and expertise to assess the situation and provide you with accurate information and guidance. They can help determine the severity of the poisoning and recommend appropriate treatment options.
2. Specific instructions: Each case of poisoning is unique, and the appropriate course of action may vary depending on the substance ingested and the dog’s condition. By contacting a professional, you can receive specific instructions tailored to your dog’s situation.
3. Access to resources: Veterinarians and poison control centers have access to resources that can aid in the diagnosis and treatment of poisoning cases. They can provide you with information on antidotes, supportive care, and potential complications to watch out for.
4. Peace of mind: Dealing with a poisoned pet can be extremely stressful and overwhelming. By reaching out to a professional, you can gain peace of mind knowing that you are doing everything possible to help your dog. They can provide reassurance and support during this difficult time.